1. Introduction
Welcome to the YGN Effects Framework documentation! This guide covers the software side of the FV-1 platform: writing SpinASM programs, assembling them into EEPROM files and loading them onto a pedal.
SpinASM for VS Code is a cross-platform Visual Studio Code extension. It understands .spn source files and works with the open-source asfv1 assembler. Together, they provide syntax highlighting, completion, inline diagnostics and live resource tracking while you work on Windows, macOS or Linux. You can use the editing and compiling workflow without programmer hardware.
It helps to think of the workflow as three separate stops. Each program bank corresponds to one of the eight program slots in an FV-1 EEPROM:
- Write and inspect a
.spnprogram. Study an existing effect or start a new one. The editor’s completion, symbol help and diagnostics help you catch small mistakes before they become compiler errors. - Assemble the program. Build one bank, every populated bank or a complete raw
output.binimage. Stop here if you only need files for another tool or manufacturing workflow. - Program an EEPROM. Use a compatible programmer to upload a compiled program directly from VS Code.
You can stop at any of these points. If you’re new to the extension, we’ll begin with the editor and project layout, then use a small compile to confirm that asfv1 is configured before connecting hardware. That separation keeps the software setup easy to test and means you don’t need a programmer on the bench just to learn the language.
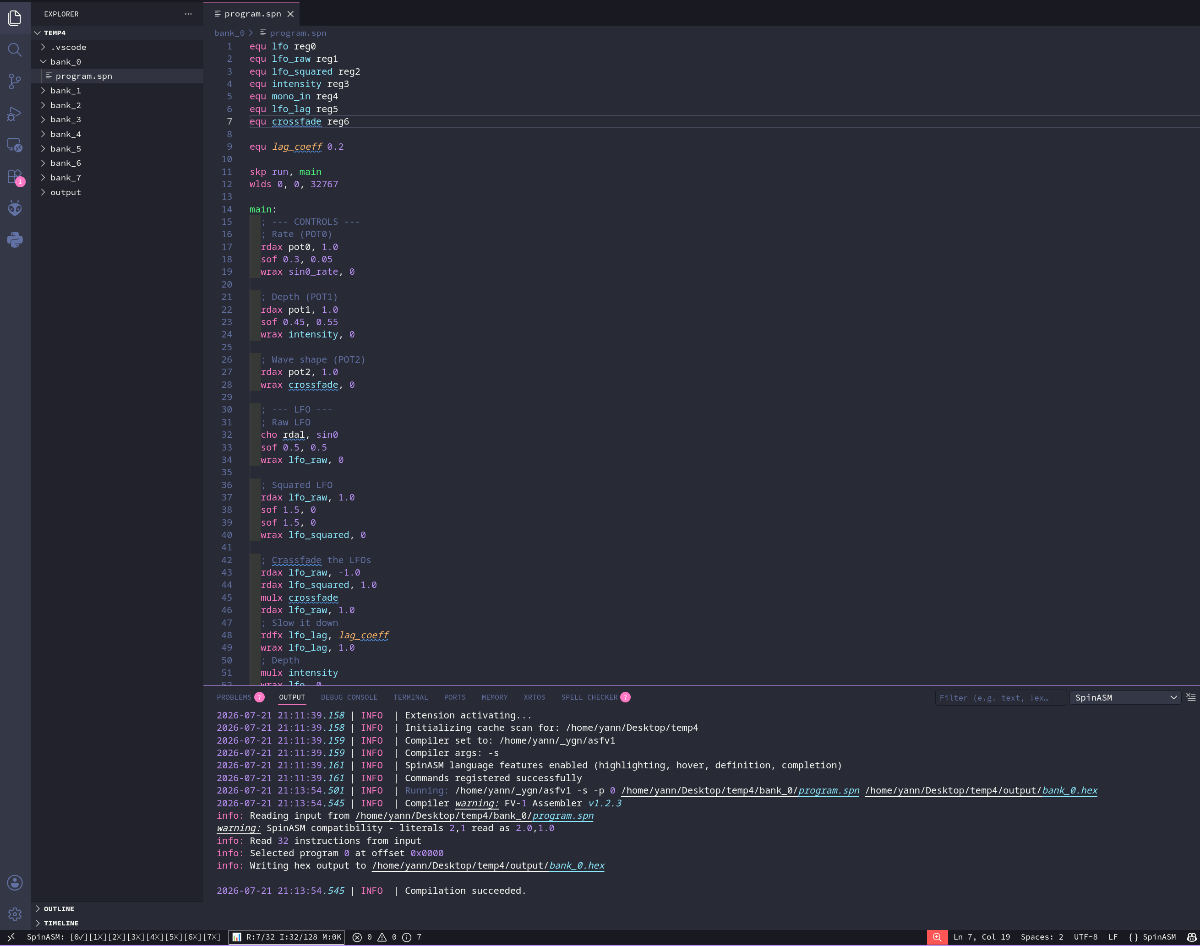
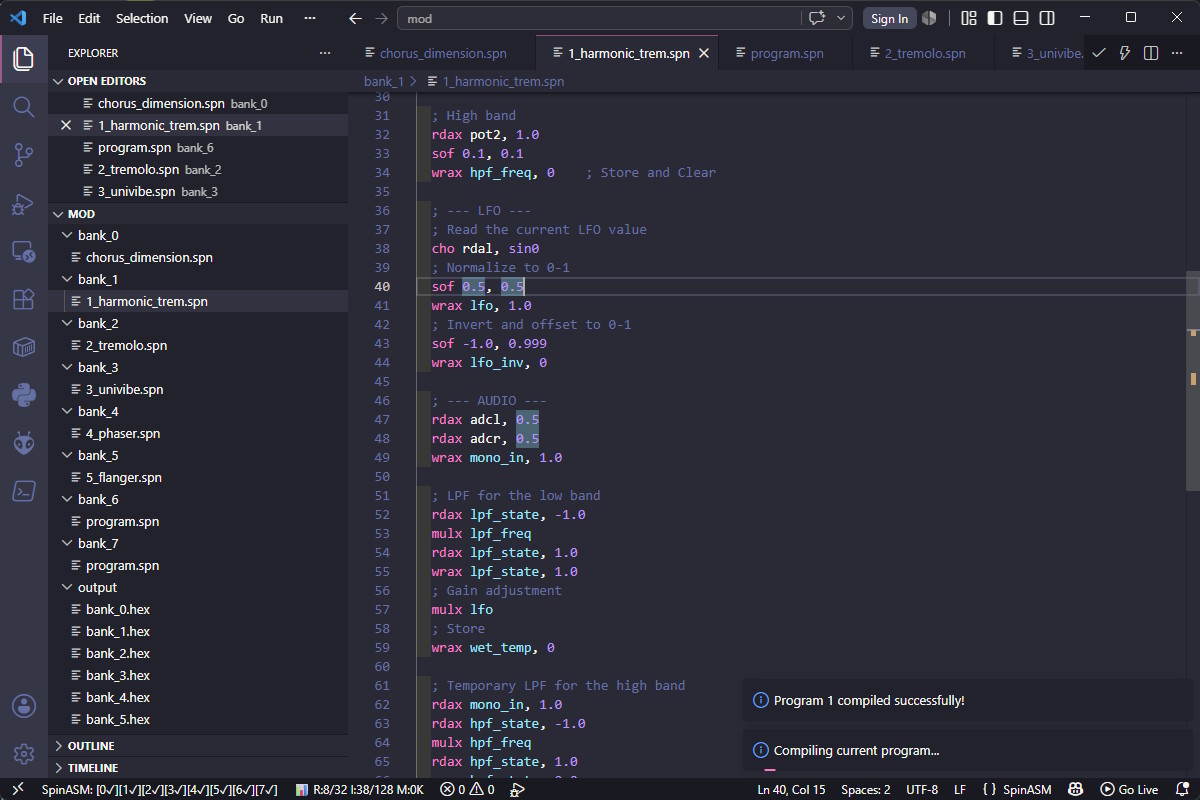
The overview below shows the pieces working together: a .spn file in the editor, live diagnostics and the bank and resource indicators.
2. Install and Configure
SpinASM for VS Code provides the editing workflow, while asfv1 assembles your .spn source into code the FV-1 can run. Install both pieces before you try to compile a program. Direct EEPROM programming is optional and can wait until the software workflow is working.
What you need
| Item | Required for | Notes |
|---|---|---|
| Visual Studio Code 1.95 or newer | Running the extension | The extension supports Windows, macOS and Linux. |
| SpinASM for VS Code | Editing, assembling and integrated programming | The extension adds support for .spn files. |
Python 3 and asfv1 |
Assembling programs and EEPROM images | Python runs the open-source FV-1 assembler. |
| Compatible programmer hardware | Direct EEPROM programming from VS Code | Optional. Editing and assembling work without it. |
Install the extension
- Open Visual Studio Code.
- Open the Extensions view with
Ctrl+Shift+Xon Windows or Linux, orCmd+Shift+Xon macOS. - Search for
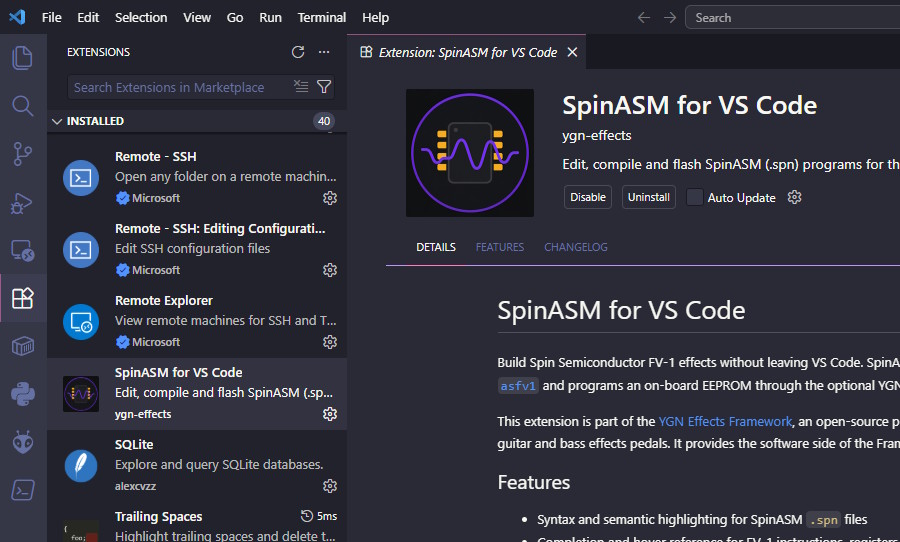
@id:ygn-effects.vscode-spinasm. - Select SpinASM for VS Code from YGN Effects and click Install.
- Open any
.spnfile. VS Code should identify its language as SpinASM in the lower-right corner of the window.
Note: The extension may warn that its compiler path is not configured. That is expected until you install
asfv1and complete the final steps in this section.
Install asfv1
The extension launches asfv1 as a separate executable, so it needs the complete path to that file. Use the instructions for your operating system, then copy the path for the configuration step below.
Windows
-
Open PowerShell and check for Python:
py --version - If the command is missing, install Python 3 from python.org, then open a new PowerShell window.
-
Install the assembler:
py -m pip install --user asfv1 -
Locate its executable:
Get-Command asfv1.exe | Select-Object -ExpandProperty Source - Copy the complete path returned by PowerShell. You will add it to VS Code shortly.
Tip: If PowerShell cannot find
asfv1.exe, read the warning printed bypip. It normally names the PythonScriptsfolder that is not on yourPATH. Open that folder and copy the full path toasfv1.exe.
macOS
-
Open Terminal and check for Python:
python3 --version - If the command is missing, install Python 3 from python.org, then open a new Terminal window.
-
Install the assembler for your user account:
python3 -m pip install --user asfv1 -
Locate its executable:
command -v asfv1 - Copy the complete path returned by the command.
Linux
-
Open a terminal and check that Python 3 and
pipare available:python3 --version python3 -m pip --version - If either command is missing, install your distribution’s Python 3 and
pippackages. For example, Debian and Ubuntu usepython3andpython3-pip. -
Install the assembler for your user account:
python3 -m pip install --user asfv1 -
Locate its executable:
command -v asfv1 - Copy the complete path returned by the command.
Tip: Some current Linux distributions prevent
pipfrom changing their managed Python installation. If you see anexternally-managed-environmenterror, installpipxthrough your package manager, runpipx install asfv1and locate the executable again.
Tip: On macOS or Linux, a successful user installation can still place
asfv1outside your shell’sPATH. Runpython3 -m site --user-baseand look forasfv1inside that location’sbinfolder. The extension can use the full path even when your terminal cannot find it by name.
Configure the compiler path
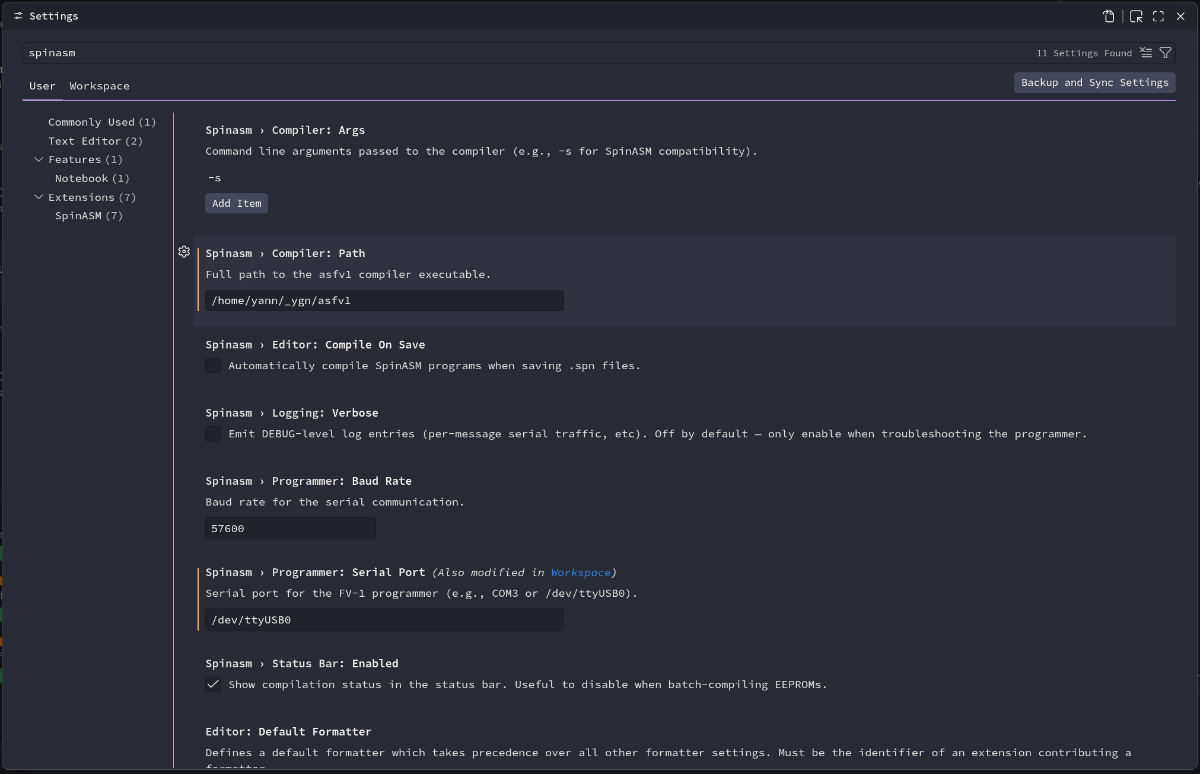
The extension uses the full executable path you provide instead of relying on your shell’s PATH. This makes the setting reliable across terminals and operating systems.
- Open VS Code Settings with
Ctrl+,on Windows or Linux, orCmd+,on macOS. - Search the Settings view for
SpinASM. - Paste the complete
asfv1executable path intospinasm.compiler.path. Enter the path itself without surrounding quotation marks. - Leave
spinasm.compiler.argsset to its default value of["-s"]. - Open the Command Palette with
Ctrl+Shift+Pon Windows or Linux, orCmd+Shift+Pon macOS. - Run SpinASM: Show Configuration.
- Confirm that the message shows the compiler path you entered.
Note: An empty serial port and the default
57600baud rate are normal when you are not using programmer hardware. You will configure a port only if you follow the integrated programming stage later in this guide.
Caution: Keep the default
-scompiler argument unless you have a specific reason to change SpinASM literal handling. Removing it can change howasfv1interprets the integer literals1and2in existing SpinASM source.
The compiler path is now configured. The first real compilation in this guide will confirm that VS Code can launch asfv1 and create an output file.
3. Understand the Project Layout
Before writing a program, give the extension a predictable place to find it. An FV-1 EEPROM provides eight program slots. SpinASM for VS Code maps those slots to folders named bank_0 through bank_7, so the folder chooses the slot and the .spn filename can describe the effect.
A typical project looks like this:
my-fv1-project/
├── bank_0/
│   └── chorus.spn
├── bank_1/
│   └── delay.spn
├── bank_2/
│   └── reverb.spn
├── bank_3/
├── bank_4/
├── bank_5/
├── bank_6/
├── bank_7/
└── output/
    ├── bank_0.hex
    ├── bank_1.hex
    ├── bank_2.hex
    └── output.bin
The .hex files are individual bank outputs. The output.bin file is the complete 4 KB EEPROM image. The extension creates the output folder when needed, and output files appear as you run the corresponding compile commands. An empty output folder is normal in a new project.
Create a new project
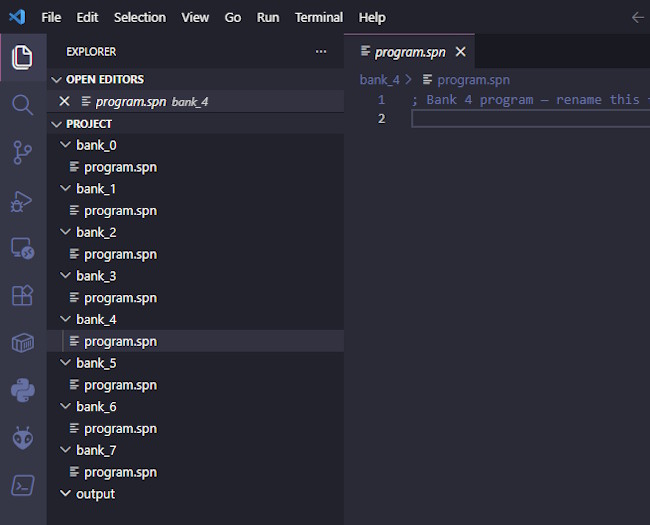
The Create Project command creates all eight bank folders, the output folder and a starter file named program.spn in every bank. Each starter file contains a comment identifying its bank and no DSP instructions yet. You can run this command before configuring the compiler because it only creates the project structure.
- Create a dedicated empty folder for your FV-1 project.
- Open that folder in VS Code with File > Open Folder.
- Open the Command Palette with
Ctrl+Shift+Pon Windows or Linux, orCmd+Shift+Pon macOS. - Run SpinASM: Create Project.
- Confirm that the Explorer now contains
bank_0throughbank_7andoutput. - Rename each
program.spnfile to describe the effect you plan to place in that bank, such aschorus.spnorplate-reverb.spn. - Delete the starter
.spnfile from any bank you do not want to populate. You may keep the empty bank folder or remove it.
Tip: Run Create Project in a dedicated project folder. The command preserves existing folders and starter files, but a clean folder makes the eight-bank layout much easier to understand.
Open an existing project
You do not need to recreate a project that already follows the bank layout.
- Open the project root in VS Code. Open the folder that contains the
bank_0throughbank_7folders, not an individual bank. - Check that every populated bank contains one
.spnfile. - Open one of those files. The extension will scan the workspace and show the project state in the status bar.
Note: A manually created project does not need all eight bank folders. Missing folders and folders without a
.spnfile are treated as empty banks. Theoutputfolder is also optional because the extension creates it when needed.
Keep no more than one program in each bank
Keep no more than one .spn file inside each bank_N folder. If a bank contains several, the extension sorts their filenames, selects the first one and reports the others as an ambiguity. This makes the result repeatable, but it may not be the program you intended to build.
Note: Do not use a bank folder as general storage for alternate
.spnfiles. Move experiments and previous versions outsidebank_0throughbank_7, or change their filename extension, before you compile.
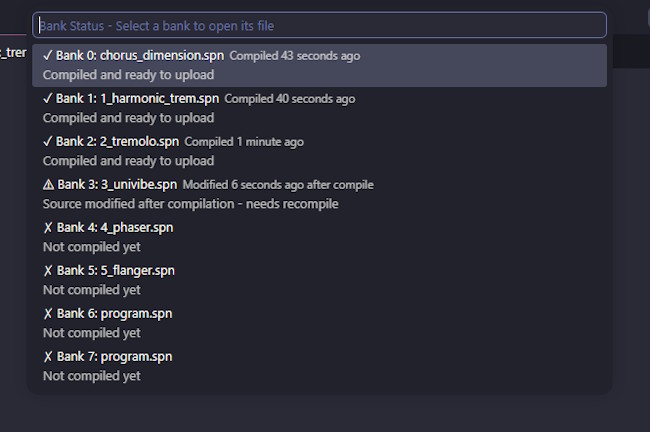
Read the bank status
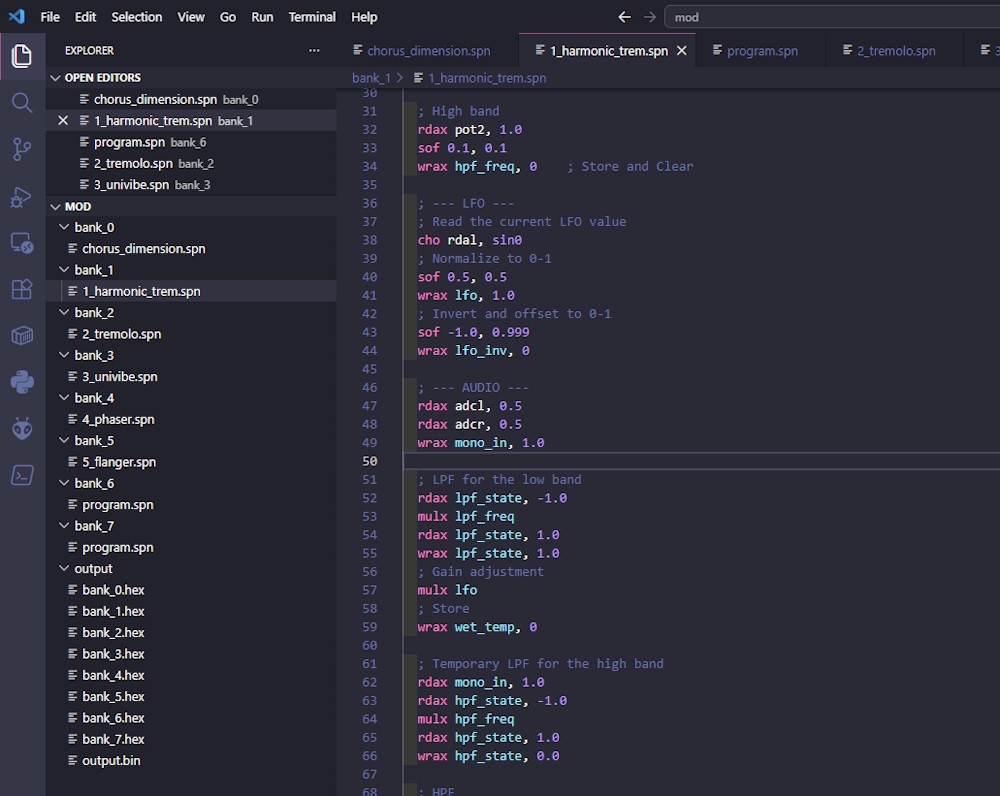
The bank indicator gives you a quick view of which programs are ready to compile or upload:
| Symbol | Meaning |
|---|---|
- |
The bank is empty. |
✗ |
A .spn file exists but has not been compiled. |
✓ |
The compiled HEX file is at least as recent as its source. |
⚠ |
The .spn source changed after its last compilation. |
Click the indicator or run SpinASM: Show Bank Status to inspect all eight slots. The detailed view names each source file, identifies stale output and warns when a bank contains extra .spn files. Selecting a populated bank opens its source and offers to compile it when its output is missing or stale.
4. Work with SpinASM Files
With the workspace mapped, you can work on one .spn file without a programmer connected. The extension treats each file as one FV-1 program and adds language-aware help while you type. Use it to study an existing effect, write one from scratch or prepare a small test program before connecting hardware.
Create or open a program
- Choose the bank that should contain the program.
- Open its existing
.spnfile, or create a new file inside thatbank_Nfolder. - Give a new file a descriptive name ending in
.spn, such aspassthrough.spn. -
Enter a small program. This example sends the FV-1’s left input directly to its left output:
; Left-channel passthrough rdax ADCL, 1.0 wrax DACL, 0.0 - Save the file. The bank indicator will show that the new source has not been compiled yet.
Note: The parent
bank_Nfolder selects the EEPROM slot. Renamingpassthrough.spndoes not move it to another bank.
Use completion and snippets
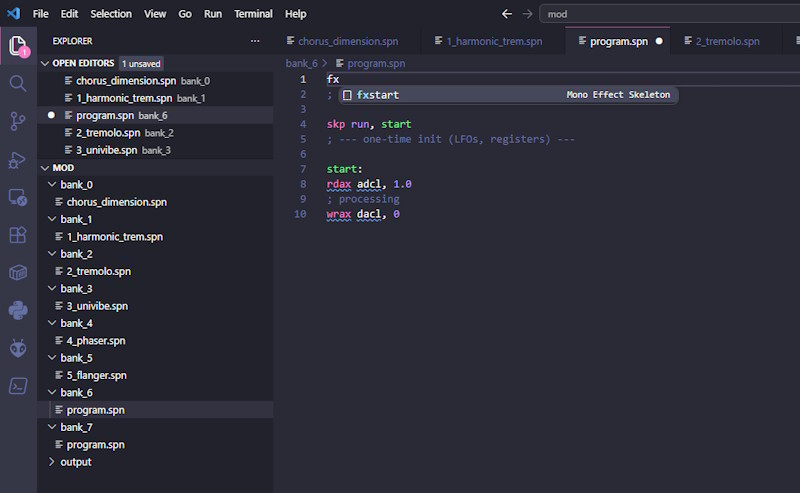
Completion is VS Code’s list of inline suggestions. As you type, the extension suggests SpinASM instructions, built-in registers, condition flags and symbols declared in the current file. Each built-in completion includes its instruction signature and a short explanation.
- Place the cursor on a blank line and start typing an instruction such as
rdax. - Select the matching completion to insert it.
- Press
Tabto move between the instruction’s operand placeholders.
The extension also includes larger snippets for common structures:
| Prefix | Inserts |
|---|---|
fxstart |
A mono effect skeleton with one-time initialization, ADC input and DAC output. |
skprun |
A run-once initialization block using the RUN condition. |
adcsetup |
A pair of instructions that reads both ADC inputs. |
dacwrite |
A pair of instructions that writes both DAC outputs. |
allpass |
An all-pass delay section using RDA and WRAP. |
lpf |
A first-order low-pass filter using RDFX and WRAX. |
Tip: Individual instructions also have snippets. If the completion list does not open automatically, press
Ctrl+Spaceon Windows or Linux. On macOS, use the configured Trigger Suggest shortcut becauseCtrl+Spacemay be reserved for input-source switching.
Inspect instructions and symbols
You do not have to keep a reference table beside the editor for every small question. EQU defines a named constant or register alias, MEM reserves a delay-memory block and a label marks a location that another instruction can jump to.
- Hover over a built-in instruction, register or flag to see its signature and purpose.
- Hover over a user-defined
EQU,MEMor jump label to see what kind of symbol it is. - Open Go to Definition on a user-defined symbol with
F12, orCtrl+Clickon Windows and Linux andCmd+Clickon macOS.
Go to Definition stays inside the current .spn file because each FV-1 program is assembled as a single source file. Built-in instructions and registers have hover documentation but no local definition to open.
Read live diagnostics
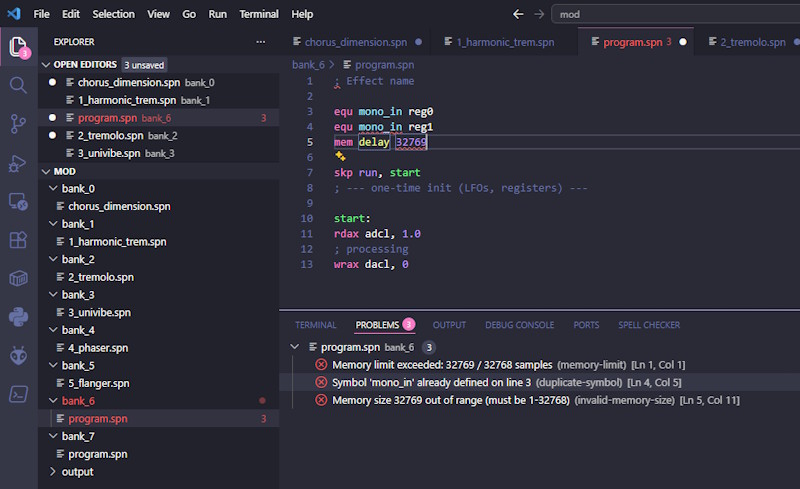
The extension checks the active document shortly after you stop typing and again whenever you save. Problems appear as editor underlines and in VS Code’s Problems view. These checks do not require programmer hardware.
The live checks cover common mistakes including:
- malformed
EQUandMEMdeclarations - duplicate or undefined symbols
- missing instruction operands or commas
- coefficients that are likely outside their valid range
- instruction and delay-memory limits
- Hover over an underlined problem to read its explanation.
- Open the Problems view with
Ctrl+Shift+Mon Windows or Linux, orCmd+Shift+Mon macOS, to review every diagnostic in the file. - Select a problem to jump directly to its source line.
- Correct the source and save it to refresh both diagnostics and bank status.
Note: Live diagnostics provide quick feedback before compilation.
asfv1remains the final authority. When you compile, its warnings and errors are also attached to the relevant.spnfile and shown in the Problems view.
Watch FV-1 resource usage
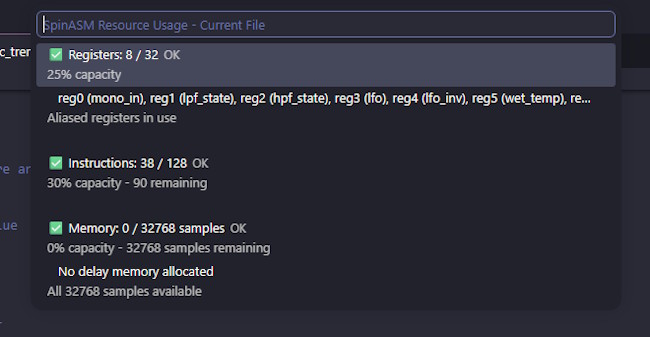
Each FV-1 program has three important resource limits: 32 general-purpose registers, 128 instructions and 32,768 delay-memory samples. The resource indicator updates while you edit the active .spn file.
- Find the
R,IandMvalues in the VS Code status bar. They show the number of registers used, the instruction count and approximate delay-memory use. TheMvalue is rounded in the status bar. - Click the resource indicator, or run SpinASM: Show Resource Usage, to open the detailed view.
- Review the named register aliases, remaining instructions and each
MEMallocation. - Reduce or reorganize the program if the indicator enters its warning or critical state.
Tip: The two SpinASM status indicators answer different questions. The eight-bank indicator tracks whether project outputs are current. The resource indicator tracks whether the active source fits inside one FV-1 program slot.
5. Compile Programs and EEPROM Images
This is the handoff from readable SpinASM source to files an FV-1 EEPROM can use. Compiling, also called assembling, converts your source into 32-bit FV-1 instructions. You can build one bank, every populated bank or one complete image. No programmer hardware is required for any command in this section.
Choose the output you need
| Command | Source it builds | Output |
|---|---|---|
| SpinASM: Compile current program | The .spn file open in the active editor |
output/bank_N.hex |
| SpinASM: Compile Specific Bank… | One populated bank selected from a list | output/bank_N.hex |
| SpinASM: Compile all programs | Every populated bank | One output/bank_N.hex per populated bank |
| SpinASM: Compile all programs to .bin | Every populated bank | output/output.bin |
An individual .hex file uses the Intel HEX format and includes the address of its EEPROM bank. The combined output.bin file is a raw 4 KB image containing all eight slots.
Compile the current program
Once your source is saved, this is the shortest path from one .spn file to a usable bank output.
- Open the
.spnfile you want to build. - Save your latest changes.
- Run SpinASM: Compile current program from the Command Palette, click the checkmark button in the editor title or press
Ctrl+Alt+B. - Wait for the success message.
- Find
bank_N.hexinside the project’soutputfolder, whereNmatches the source file’s bank folder. - Confirm that the bank status changes to
✓.
Tip: If you are looking at the wrong editor, use SpinASM: Compile Specific Bank… and select the intended populated bank. An empty bank has no source to compile.
Compile every populated bank
After one program compiles cleanly, you can rebuild the whole project without opening each source file individually.
- Save all changed
.spnfiles. - Open the Command Palette.
- Run SpinASM: Compile all programs.
- Wait while the extension builds the populated banks in order from 0 through 7. Empty banks are skipped.
- Inspect the
outputfolder and bank indicator. Each populated bank should have a currentbank_N.hexfile.
If any bank fails, the command stops and reports the compiler error. Fix that source before running the command again.
Build a complete EEPROM image
Use a combined image when another tool or manufacturing process expects the entire EEPROM as one raw binary file.
- Save every program you want to include.
- Open the Command Palette.
- Run SpinASM: Compile all programs to .bin.
- Wait for Combined EEPROM image written to output.bin!.
- Find the 4 KB file at
output/output.bin.
The extension assembles each populated bank into its correct 512-byte slot, then combines all eight slots in bank order. Empty banks are filled with 0x00 bytes.
Note: Building
output.bindoes not create or refresh the individualbank_N.hexfiles. Run Compile all programs as well if you need both output formats or want every bank-status symbol to show✓.
Caution: A complete
output.binrepresents the whole EEPROM, including empty banks. Writing it with another tool replaces every slot on the device.
Read compiler messages
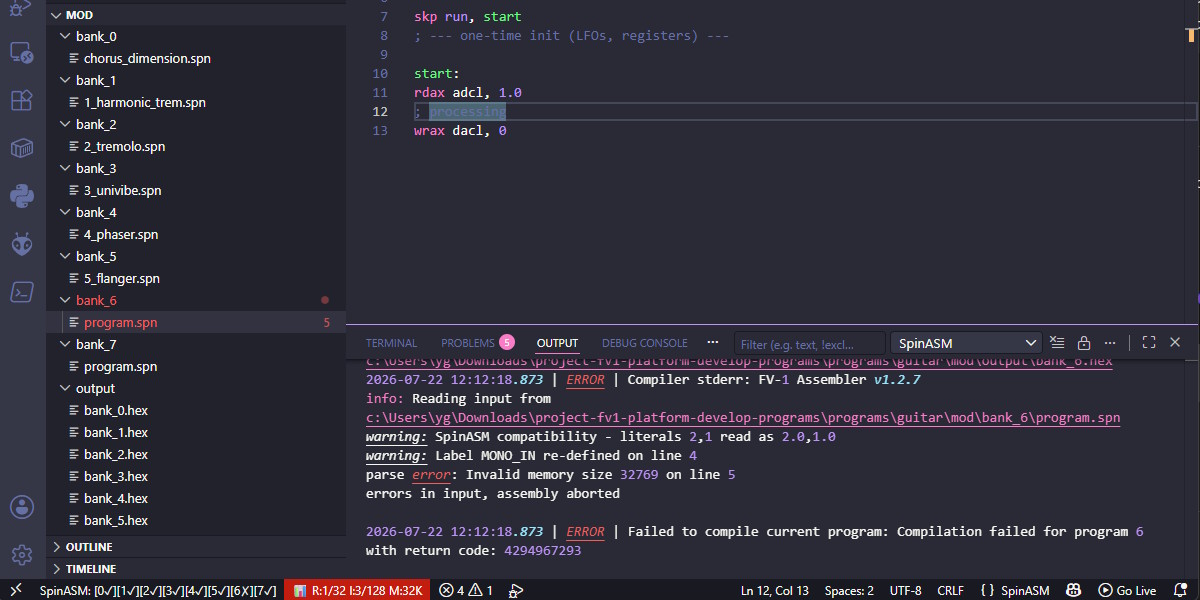
Compiler warnings and errors appear as diagnostics on the source file. When a compile error occurs, the extension automatically reveals the SpinASM output channel so you can see the compiler’s output.
- If the channel is not visible, open View > Output.
- Select SpinASM from the output-channel list.
- Read the
asfv1command, warning or error recorded for the affected bank. - Return to the underlined source line, correct it and compile again.
Caution: Do not use an upload-only command after a failed compile. The extension removes an existing
bank_N.hexbefore starting a fresh compile, so wait for a successful output before uploading.
Tip: Keep the SpinASM output channel open while learning how source changes map to
asfv1messages.
6. Program an EEPROM
Once a program compiles cleanly, you can program a target EEPROM directly from VS Code with a compatible programmer. This section covers the two integrated programmer designs supported by SpinASM. Both use the same commands and provide automatic read-back verification.
Choose a programming method
Choose the hardware that matches your build:
| Method | Additional hardware | What it writes | Verification |
|---|---|---|---|
| YGN FV-1 EEPROM Programmer | Dedicated YGN programmer connected to the target board | One selected bank or every populated bank | Automatic read-back comparison |
| Arduino Pro Mini 3.3 V | 3.3 V Arduino Pro Mini and USB-to-serial adapter | One selected bank or every populated bank | Automatic read-back comparison |
Complete the setup guide for your hardware before continuing:
The rest of this section covers the shared VS Code workflow. The physical wiring and power arrangement belong to each programmer’s setup guide.
Connect an integrated programmer
- Connect the programmer to the target board exactly as shown in its setup guide.
- Power on the target board. Both supported designs rely on the target’s 3.3 V supply during normal EEPROM programming.
- Connect the programmer or USB-to-serial adapter to your computer.
- Open the FV-1 project in VS Code.
Caution: Keep 5 V power and 5 V serial logic away from the FV-1 programming connection. The target EEPROM, programming header and Arduino Pro Mini workflow operate at 3.3 V.
Detect and check the hardware
- Open the Command Palette.
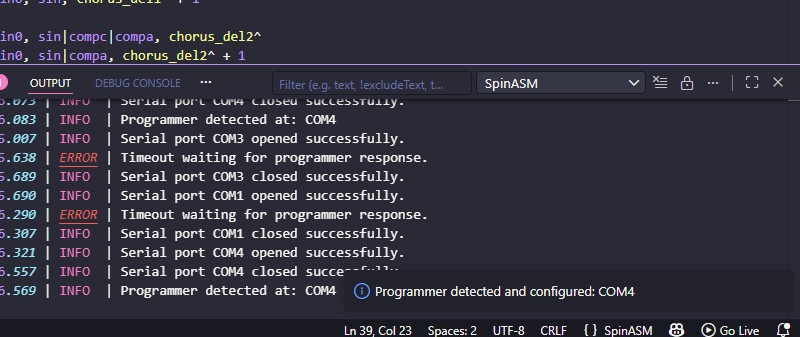
- Run SpinASM: Auto-Detect Programmer.
- Confirm that the extension reports the detected serial port.
- If detection fails, run SpinASM: Select Serial Port… and choose the programmer manually.
- Run SpinASM: Check Hardware Connection.
- Confirm that VS Code reports the compiler and programmer are connected and ready.
The hardware check validates three parts of the chain: the configured asfv1 executable, the programmer’s serial response and communication with the target EEPROM. The selected serial port is stored as a machine-level VS Code setting so it is not committed with your project.
Tip: Run SpinASM: Show Configuration at any time to review the compiler path, serial port and baud rate together.
Compile, upload and verify one bank
The safest everyday command is Compile & Upload current program. It rebuilds the source first, writes only that program’s 512-byte bank and verifies the result.
- Open the
.spnfile you want to test. - Save your latest changes.
- Run SpinASM: Compile & Upload current program from the Command Palette, click the lightning-bolt button in the editor title or press
Ctrl+Alt+U. - Keep the target powered and connected while the operation runs.
- Wait for the success message.
After writing the bank, the extension reads all 512 bytes back from the EEPROM and compares them with the compiled program. It reports an error if any byte differs, so a successful message confirms both the write and read-back verification.
Note: Programming one bank leaves the other seven EEPROM slots unchanged. This is useful while developing an effect because you can update one program without rebuilding the complete EEPROM image.
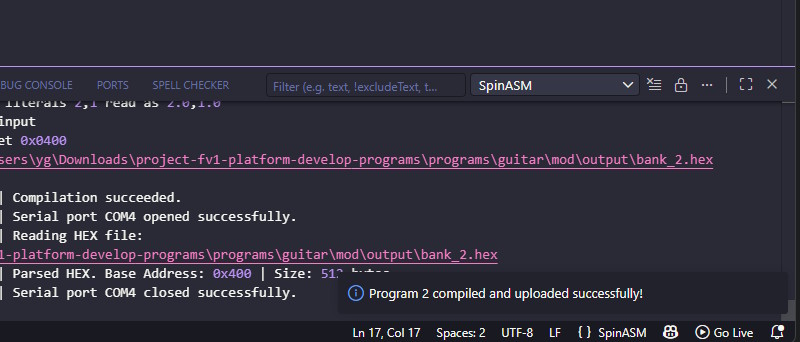
Program a selected bank or all populated banks
- Run SpinASM: Compile & Upload Specific Bank… when you want to choose a populated bank without opening its source first.
- Run SpinASM: Compile & Upload all programs when you want to rebuild, write and verify every populated bank in order.
- Wait for the final message to report how many banks completed.
Empty banks are skipped, so Compile & Upload all programs does not erase their existing EEPROM contents.
Upload-only commands skip compilation and use the existing bank_N.hex files:
- SpinASM: Upload current program
- SpinASM: Upload Specific Bank…
- SpinASM: Upload all programs
Caution: Use an upload-only command only when you intentionally want the last compiled output. It does not rebuild changed source. If you are unsure, use the matching Compile & Upload command.
7. Command Reference
Use this section when you know what you want to do and need the exact SpinASM command. Open the Command Palette and type SpinASM to see the available commands.
Commands that act on the current program appear only while a .spn editor is active. Project commands require an open workspace folder. Configuration and programmer-selection commands can run from any editor.
Project and status commands
| Command | What it does |
|---|---|
| SpinASM: Create Project | Adds bank_0 through bank_7, a starter program.spn in each bank and the output folder to the open workspace. Existing folders and starter files are preserved. It does not require or test the compiler. |
| SpinASM: Show Bank Status | Lists all eight banks for the active workspace folder. It shows empty, uncompiled, current, stale and ambiguous states. Selecting a populated bank opens its source and offers compile actions when needed. |
| SpinASM: Show Resource Usage | Shows register, instruction and delay-memory use for the active .spn file. It does not analyze the other banks. |
| SpinASM: Show Configuration | Displays the current compiler path, serial port and baud rate. Its Open Settings button opens the SpinASM settings view. It reports configured values but does not test them. |
| SpinASM: Check Hardware Connection | Checks that the compiler path is executable, opens the configured serial port, confirms that a compatible programmer responds and confirms that the target EEPROM is ready. Programmer hardware is required. |
Programmer selection commands
| Command | What it does |
|---|---|
| SpinASM: Auto-Detect Programmer | Lists the computer’s serial ports and probes them at the configured baud rate until a compatible YGN protocol response is found. It stores the first responding port but does not check EEPROM readiness. Run Check Hardware Connection afterwards for the complete test. |
| SpinASM: Select Serial Port… | Lists detected serial ports with any available manufacturer, USB vendor ID and product ID. Your selection is stored globally on that machine. The command selects a port but does not test the programmer. |
Compile commands
| Command | What it does |
|---|---|
| SpinASM: Compile current program | Finds the bank of the active or selected .spn file, runs asfv1 and replaces that bank’s output/bank_N.hex. No programmer is used. |
| SpinASM: Compile Specific Bank… | Prompts for bank 0 through 7, then builds that bank’s .spn file into bank_N.hex. Selecting an empty bank produces an error because there is no source. |
| SpinASM: Compile all programs | Builds a separate bank_N.hex for every populated bank in numeric order. Empty banks are skipped. The operation stops if one bank fails. |
| SpinASM: Compile all programs to .bin | Compiles the populated banks to temporary binary data and combines them into the 4 KB output/output.bin. Empty slots are filled with 0x00. It does not create or refresh bank_N.hex. |
Upload-only commands
Every upload-only command uses existing HEX output, writes each selected 512-byte bank and performs read-back verification. It does not rebuild changed source.
| Command | What it does |
|---|---|
| SpinASM: Upload current program | Uploads the existing bank_N.hex associated with the active or selected .spn file. It fails if that output does not exist. |
| SpinASM: Upload Specific Bank… | Prompts for one bank and uploads its existing bank_N.hex. It does not check whether the source is newer than the output. |
| SpinASM: Upload all programs | Uploads existing HEX output for every populated bank in numeric order. Empty banks are skipped and left unchanged on the EEPROM. A missing output or failed verification stops the operation. |
Compile and upload commands
These commands run the matching compile operation first, then write and verify the resulting bank or banks. They are the safest choices during normal development.
| Command | What it does |
|---|---|
| SpinASM: Compile & Upload current program | Rebuilds the active or selected program, uploads its bank and verifies all 512 bytes. |
| SpinASM: Compile & Upload Specific Bank… | Prompts for one bank, rebuilds its source, uploads it and verifies all 512 bytes. |
| SpinASM: Compile & Upload all programs | Rebuilds, uploads and verifies every populated bank in numeric order. Empty banks are skipped and left unchanged. |
Buttons, menus and shortcuts
The most common current-program commands are also available closer to the source file:
| Location | Available actions |
|---|---|
| Editor title | Compile current program, Compile & Upload current program |
| Editor context menu | Compile current program, Compile & Upload current program, Upload current program |
Explorer .spn context menu |
Compile current program, Compile & Upload current program, Upload current program |
| Bank status indicator | Show Bank Status |
| Resource status indicator | Show Resource Usage |
Ctrl+Alt+B |
Compile current program |
Ctrl+Alt+U |
Compile & Upload current program |
Tip: Editor and Explorer actions operate on the file where you invoked them. Command Palette actions for the current program use the active editor. This distinction is useful when several
.spnfiles are open in split editors.
8. Settings Reference
SpinASM’s settings control the assembler, integrated programmer and editor feedback. Open Settings and search for SpinASM to see all seven options.
Compiler paths and serial-port names belong to the machine running VS Code. The baud rate must match the firmware running on the connected programmer. Prefer the User setting level for machine-specific hardware values. Store editing preferences globally or with a workspace when a project needs consistent behavior.
| Setting | Default | What it changes |
|---|---|---|
spinasm.compiler.path |
Empty | Full path to the asfv1 executable. Every compile command needs this path. Enter the executable path without quotation marks, even when the path contains spaces. |
spinasm.compiler.args |
["-s"] |
Arguments inserted before the bank, input and output arguments on every asfv1 invocation. The default -s enables SpinASM-compatible handling of the integer literals 1 and 2. |
spinasm.programmer.serialPort |
Empty | Serial port used by integrated upload and hardware-check commands. Auto-detect and manual selection save this value as a global machine setting. |
spinasm.programmer.baudRate |
57600 |
Speed used for auto-detection and all YGN programmer communication. It must match the firmware running on the programmer. |
spinasm.editor.compileOnSave |
false |
Compiles a saved .spn file into its individual bank_N.hex when it belongs to a project bank. It does not build output.bin or upload anything. |
spinasm.statusBar.enabled |
true |
Shows or hides the eight-bank compilation summary. It does not hide the separate resource-usage indicator for the active .spn file. |
spinasm.logging.verbose |
false |
Adds debug-level details to the SpinASM output channel, including individual programmer messages. Enable it only while diagnosing serial communication. |
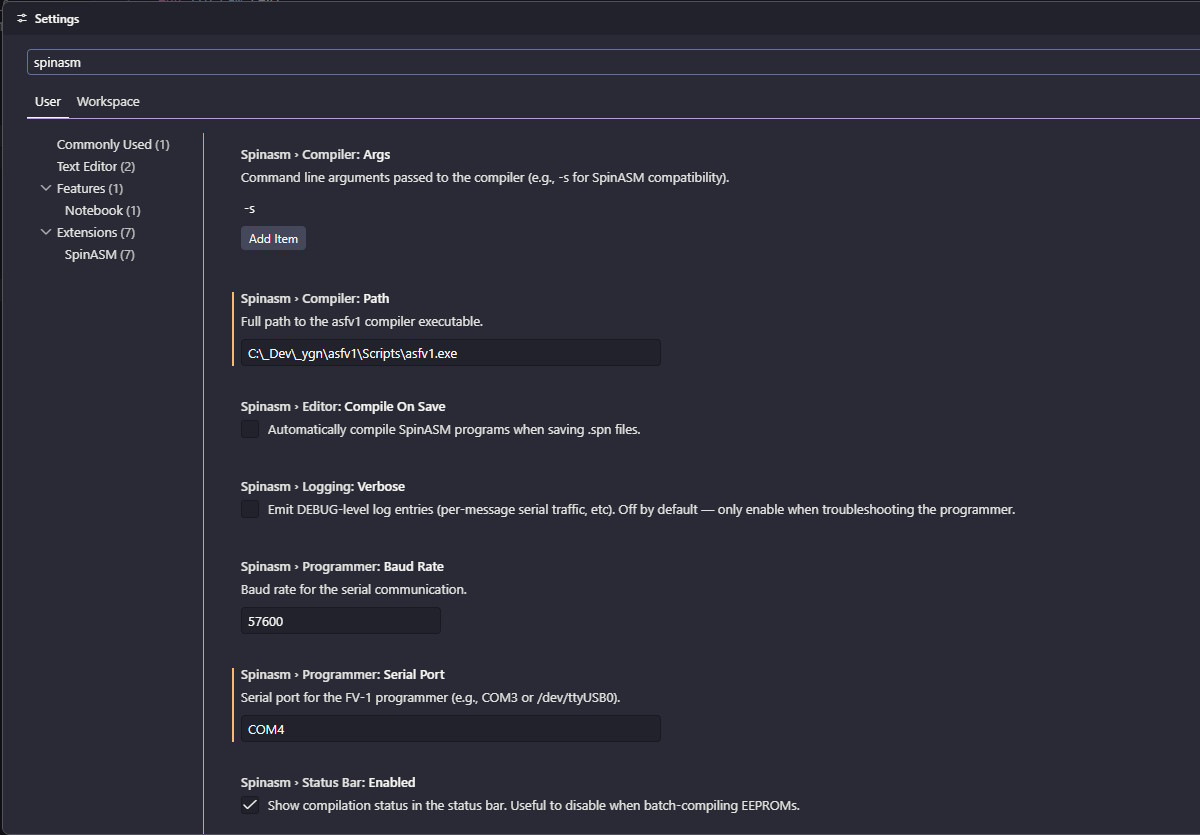
Compiler settings
These settings affect every compile command, so confirm them before troubleshooting source code.
- Set
spinasm.compiler.pathto the complete executable path found during installation. - Keep
spinasm.compiler.argsat["-s"]for normal SpinASM source. - Run SpinASM: Show Configuration to confirm the stored path.
- Compile one program to prove that the executable can run.
Note: Show Configuration displays the saved path but does not verify whether the file exists or is executable. A compile command or Check Hardware Connection performs that validation.
Programmer settings
These settings matter only when using direct VS Code programming. The serial port is normally easier to set through Auto-Detect Programmer or Select Serial Port… than by typing it yourself. Typical names include COM3 on Windows, /dev/cu.usbserial-* on macOS and /dev/ttyUSB0 on Linux, but the correct value depends on the connected adapter and operating system.
- Leave the baud rate at
57600when using the supplied YGN programmer firmware. - Run auto-detect after connecting and powering the programmer.
- Use manual port selection when several serial devices are connected or auto-detect cannot identify the correct one.
- Run the hardware check before your first upload.
Caution: Changing the baud rate in VS Code does not change the programmer firmware. A mismatch prevents the two sides from communicating.
Editing and display settings
Compile on save is convenient once a project builds cleanly, but it changes what happens after every save.
- Enable
spinasm.editor.compileOnSaveif you want each saved bank to refresh its HEX output automatically. - Watch the Problems view and SpinASM output channel for compiler errors after saving.
- Keep it disabled when you prefer to separate editing from deliberate builds.
The status-bar setting controls only the bank summary. Leave it enabled for normal eight-bank projects, or disable it when the summary is distracting during batch preparation. Resource usage remains visible while a .spn file is active.
Verbose logging
Normal logging records high-level project, compiler and programmer activity. Verbose logging adds low-level serial messages that are useful when detection, timeouts or verification fail.
- Enable
spinasm.logging.verbose. - Reproduce the programmer problem once.
- Open View > Output and select SpinASM.
- Save the relevant log details before closing VS Code if you need them for a bug report.
- Disable verbose logging after troubleshooting so routine output stays readable.
9. Troubleshooting
Start with the exact message shown by VS Code. After a compile error, the SpinASM output channel opens automatically. For other operations, open View > Output and select SpinASM to see the complete operation log. Compiler problems also appear in the Problems view beside the relevant source line.
The extension does not recognize a file
The editor has no SpinASM highlighting, completion or status indicators
- Confirm that the filename ends in
.spn. - Check the language indicator in the lower-right corner of VS Code.
- If it shows another language, click it and select SpinASM.
- Confirm that SpinASM for VS Code is installed and enabled in the current VS Code profile.
- For project commands, open the project root that contains your
bank_Nfolders rather than opening one file by itself.
The compiler path is missing or invalid
Compiler path is not set in Settings or Compiler path invalid or not executable
- Run
Get-Command asfv1.exein PowerShell on Windows, orcommand -v asfv1on macOS and Linux. - Copy the complete executable path returned by the command.
- Open the SpinASM settings and paste that path into
spinasm.compiler.pathwithout quotation marks. - Run SpinASM: Show Configuration and confirm the stored path.
- Compile the current program again.
If the location command returns nothing, return to the platform steps in Install and Configure. A successful installation may place asfv1 outside your shell’s PATH. Follow the corresponding tip to locate its Scripts or bin folder before reinstalling it.
The current file is not a project program
Current file is not a valid project program or Program at index N does not exist
- Confirm that the
.spnfile is inside a folder named exactlybank_0throughbank_7. - Confirm that the bank folder sits directly inside the open workspace root.
- Remove extra
.spnfiles from that bank so only the intended program remains. - Run SpinASM: Show Bank Status and select the program from the list.
- Run the compile command again from the opened source.
On Linux, folder names are case-sensitive. Use bank_0, not Bank_0 or BANK_0.
A bank is ambiguous or the wrong file builds
Bank Status reports extra .spn files in one bank
The extension sorts the filenames and uses the first candidate so its choice is repeatable. It still reports the bank as ambiguous because that choice may not match your intent.
- Open SpinASM: Show Bank Status and identify the ignored filenames.
- Move alternate sources outside every
bank_Nfolder, or change their extension while they are inactive. - Leave one
.spnfile in the bank. - Compile it again and confirm that the ambiguity warning disappears.
Compilation fails
Compilation failed for program N or an asfv1 error appears
- Open the Problems view and select the compiler diagnostic.
- Open View > Output and select SpinASM for the original
asfv1message. - Check the named line for an undefined symbol, malformed operand, missing comma or exceeded FV-1 limit.
- Keep
spinasm.compiler.argsset to["-s"]unless the source intentionally requires different literal handling. - Correct the source, save it and compile again.
Tip: A failed compile is not a programmer problem. Resolve it before connecting hardware or trying an upload command.
An upload cannot find its output
No output file found for bank N or Unable to open file
- Check Bank Status for
✗or⚠on the affected bank. - Run SpinASM: Compile current program to create a fresh
bank_N.hex. - Confirm that the file appears inside
output. - Retry the upload, or use Compile & Upload current program to perform both operations together.
No programmer is detected
No serial ports detected, Could not auto-detect programmer or Programmer did not respond
- Confirm that the target board is powered. The supported integrated programmers rely on its 3.3 V supply during normal use.
- Check the USB cable and confirm that it carries data, not power only.
- Close serial terminals, flashing tools or other programs that may have the port open.
- Leave
spinasm.programmer.baudRateat57600when using the supplied firmware. - Run SpinASM: Select Serial Port… and choose the port manually.
- Run SpinASM: Check Hardware Connection.
On Linux, your account may need permission to access the serial device through a group such as dialout or through an appropriate udev rule. Follow your distribution’s documentation, then sign out and back in if you changed group membership.
The programmer responds but the EEPROM does not
EEPROM is not ready or EEPROM isn't responding
- Keep the target board powered.
- Inspect the programming connection by signal name: SDA, SCL, FV-1 RESET, 3.3 V and GND.
- Confirm that no 5 V supply or serial logic is connected.
- Secure loose jumper wires and shorten excessively long wires where practical.
- Review the setup guide for the YGN FV-1 EEPROM Programmer or Arduino Pro Mini programmer.
- Run the hardware check again before uploading.
Read-back verification fails
Data verification failed after an upload
Do not treat a verification mismatch as a successful write. The extension read the bank back and found at least one byte that differed.
- Power-cycle the target board.
- Check the SDA, SCL and ground connections for movement or poor contact.
- Confirm that target power remains stable throughout the upload.
- Run SpinASM: Check Hardware Connection.
- Run the matching Compile & Upload command again.
- If the mismatch repeats, inspect the EEPROM, programmer connection and target-board hardware before continuing.
Collect useful information for a bug report
If the problem persists, collect enough context to reproduce it before opening an issue.
- Record your operating system, VS Code version and SpinASM for VS Code version.
- Record the exact command and error message.
- Enable verbose logging only if the problem involves programmer communication.
- Reproduce the failure once and copy the relevant SpinASM output.
- Review compiler paths and serial-port names before sharing the log if they reveal information you prefer to keep private.
- Open an issue in the YGN FV-1 platform repository with the source needed to reproduce the problem.
Found an Issue?
Help improve this documentation by reporting errors or suggesting improvements.